Step 4: Set up your own Classroom using SeeSaw (Optional)
Here you will find a quick tutorial on how to set up your class. Obviously, the more you play around with it, the easier it will become. I encourage you to try it out with your students! After the tutorial, I included the steps I took to implement SeeSaw in my third grade classroom. You do not have to follow these steps, but they worked for me, so I'm just sharing my successes with you. At the bottom, you will find some other videos that you may find useful when using SeeSaw.
Tutorial
Steps I took to Implement SeeSaw with my Third Graders:
Step 1: IntroduceI spent the first week or so really hyping up the use of SeeSaw. I called it our "Third Grade Facebook" and the kids were so excited to use it. They asked me every day that week if we could use it that given day. I briefly talked about posting text and videos and having the ability to view peers' work. The idea that they could comment on and like their posts was so intriguing to them!
Step 2: ExploreThe first day I actually showed my kids SeeSaw, we explored as a whole group. I showed them the class journal and how they would each have their own journal as well. I showed them the different ways they could post- video, text, picture, recording. We discussed as a class what they would like to use the program for. They had some great ideas- using it as a simple journal, sharing posters, using voice recording to explain something they did in class. I showed them the comment and liking aspect during this time as well, but they did not do anything with it on their devices.
|
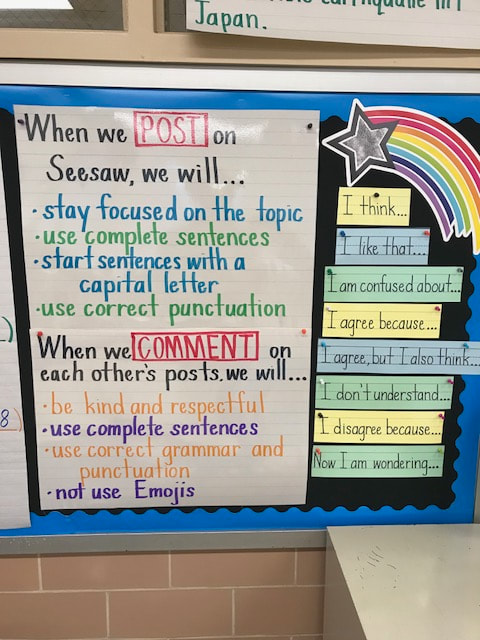
Step 3: Set ExpectationsBefore letting my kids use the program, we set class expectations together. We did this as a longer community circle. We set expectations for posting original posts one day. The next day we focused on commenting. I shared sentence starters they could use to comment on each other's posts in order to create meaningful conversation (this is still a work in progress!). I felt like it could easily be misrepresented as a "toy" rather than a tool to use in the classroom, so I had to make sure the kids were very clear with the set rules. They also knew I was going to be able to view everything that would be posted, so that helped too. We talked about how using acronyms may be okay when not in school, but when using this program in school, they should be using complete sentences, and using their best spelling & grammar. Below is a picture.
Step 4: First ActivityThe first activity I had them just practice posting a journal response. The log in process went smoothly and the kids were able to navigate the website pretty effortlessly without any help. The first day, I had them create their original post. The day after that, we logged back in and practiced commenting on a classmate's post. Kids these days are so "techie" so it went much more smoothly than I anticipated it would with our first assignment! It's a bonus that they LOVED doing it!
|
Other Useful Links:
Creating your class
Managing your class settings
Creating and managing folders
Create an activity
Share your activity with students
Browsing and saving activities
Student view of activities
Managing your class settings
Creating and managing folders
Create an activity
Share your activity with students
Browsing and saving activities
Student view of activities
